Property Decorator | input output decorator angular example | how to pass data from one component to another in angular 8

Decorator in Angular 8 | How to pass data from one component to another in angular 8


Decorators are a design that is used to separate modification or decoration of a class without modifying the original source code.

Decorators are of 4 types.


In this article we will discuss about Property decorator.

Property decorator

Property decorators are the 2nd most common decorator in angular.
Property decorators is of 2 types


  • Input 
  • Output

Input-Output-Decorator
Input Output Decorator


Input Decorator

Input decorator is declared as @Input().
@Input() can be declared by importing Input interface. 

With the Input decorator we simply put the @Input() before the property which angular compiler automatically create input binding from the property name and link them.

Lets Implement Input decorator in Angular 8.

Before that Lets create a folder called Test.

1.Go to App.component.ts and add the below code.

export class AppComponent {
    myvar: string = "This is my Input property....";
}

2.Go to App.component.Html and add the below code.

<example-component [inputprop]='myvar'></example-component>

In the above we are binding a user defined property called "inputprop" which will be linked to the Input property.

3.Create a typescript file called Test.component.ts. and write the below code under the file.

import { Component,Input } from '@angular/core';
@Component({
    selector: 'example-component',
    template: '<div>{{name}}  {{inputprop}}</div>',
})
export class ExampleComponent {
    name: string = "This is my component!!!!!";
    @Input() inputprop:string

}

In the above code we link the property defined in the App.component.ts to the above code by declaring @Input.

We are done!!!!!!!!
Once we run the application we can able to see the output in the browser...

Output Decorator

Now Lets understand Output decorator .
Output decorator declared as @output().

@Output() can be declared by importing Output Interface and EventEmitter class.

The logic behind this is variable associated with @Output hold the event assigned by EventEmitter class.

Event can be emit with the help of emit().


Lets take a scenario.

A button and string value is in child component.
When button clicked then the string value will be displayed in the parent component.

Lets implement the output decorator .

1. Under Test.component.ts write the below code.


import { Component,Output,EventEmitter} from '@angular/core';

@Component({
    selector: 'example-component',
    templateUrl: 'app/Test/Test.component.html',
})
export class ExampleComponent {  
    @Output() mydataevent = new EventEmitter<string>();
    myoutputdata: string = "My output data";
    GetData(): void {
        this.mydataevent.emit(this.myoutputdata);
    }

}

In the above Output interface and EventEmitter class are imported.
mydataevent  hold the event  and emitted to the parent in the hilighted text.

2. Under Test.component.html write the below code.

<!DOCTYPE html>
<html>
<head>
    <meta charset="utf-8" />
    <title></title>
</head>
<body>
    <button (click)="GetData()">Click Me</button>
</body>
</html>


In the above we are generating a click event and call a method called GetData() to execute the method.

3. App.Component.html write the below code.

<example-component (mydataevent)=displaymethod($event)></example-component>


{{mytestvalue}}

In the above code we received the event highlighted above and then call the displaymethod($event) to display the method content. 
$event received the data passed from the child component.

4. App.Component.ts write the below code.


export class AppComponent {    
    mytestvalue: string;   
    displaymethod(myvalue:string): void {
        this.mytestvalue = myvalue;
    }


In the above we receive data and display the data in the html by  {{mytestvalue}}

5. Do not forget to register the associated component class in the the app.module.ts. 

You can run the application and Generate a event by clicking the button. You can see the output as below once u click the button.


Output Decorator
Output Decorator

We are done!!!!!!!!!!!!!!!!!
Share:

Class Decorator in Angular 8

Introduction

Its really interesting to know why we need Decorator in Angular? If we use Decorator what is the benefit of it? These all question will be answered in this tutorial.

What is Decorator in Angular 8?

Decorators are a design pattern that is used to separate modification or decoration of a class without modifying the original source code.

Decorators are of 4 types.


In this article we will discuss about Class decorator.

Class decorator


Class Decorator in Angular 8
Class Decorator


@Component and @NgModule decorator is an example of Class decorator.

If we make a class a component class then we can declare @Component.
If we make a class a child class a module then we can declare @NgModule.

@Component


Component decorator allows you to mark a class as an Angular component and provide additional metadata that determines how the component should be processed, instantiated and used at runtime.


import { Component } from '@angular/core';

@Component({
    selector: 'example-component',
    template: '<div>{{name}}</div>',
})
export class ExampleComponent {
    name: string = "This is my component!!!!!";
}


In the above code we import Component Interface to implement Component decorator(@Component).

@NgModule

@NgModule helps to declare the child module and component to available in the angular application.

import { NgModule } from '@angular/core';

@NgModule({

    imports: [ ],

    declarations: [ ],

  bootstrap:    [ AppComponent ]

})

export class AppModule { }


In the above we have to import NgModule interface to make a class a module. Then we can use @NgModule decorator .

Under imports section we can register modules and in declarations section we can declare the components available for angular.

Note:-


In both Component class and Module class we can see there is no logic written with in the class to make the class Component or Module in Angular.

So what we need to do is decorate it and angular will do the remaining work for us.

Thanks..........
Share:

Build in Pipes in Angular 8

What is Pipes in Angular?


Pipes is nothing but transform the data into required format. We use the operator "|" to implement pipes.


In angular there are 2 types of pipes available.
In this tutorial we will discuss Build-In Pipes. If you want to know more about Custom Pipes i have already a tutorial available . You can check the link How to create Custom Pipes in Angular.

When we go for Build-in Pipes?


When we need to format the data with the help of Out of box functionality or we can say existing functionality then we can use the Build in Pipes.

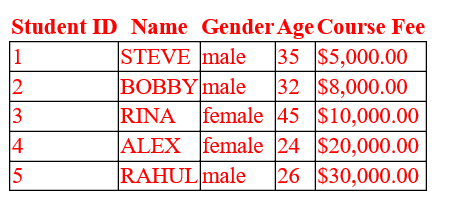
See the above Image .
Lets say we need to modify the below.


  • Name should be in capital 
  • Gender should be lower case
  • Before the Course fee value a dollar($) symbol should be there.

We can achieve the above criteria with the help of Build-in Pipes.


Lets check the existing code and then we try to modify it.

Existing Code

<table class="table table-responsive table-bordered table-striped">
    <thead>
        <tr>
            <th>Student ID</th>
            <th>Name</th>
            <th>Gender</th>
            <th>Age</th>
            <th>Course Fee</th>
           
        </tr>
    </thead>
    <tbody><tr *ngFor="let s of studentdetails">
    <td>{{s.studentID}}</td>
    <td>{{s.studentName}}</td>
    <td>{{s.gender}}</td>
    <td>{{s.age}}</td>
    <td>{{s.CourseFee}}</td>
   
</tr></tbody>
</table>


Lets modify the above code to achieve the required functionality.

After Modification

<table class="table table-responsive table-bordered table-striped">
    <thead>
        <tr>
            <th>Student ID</th>
            <th>Name</th>
            <th>Gender</th>
            <th>Age</th>
            <th>Course Fee</th>
           
        </tr>
    </thead>
    <tbody><tr *ngFor="let s of studentdetails">
    <td>{{s.studentID}}</td>
    <td>{{s.studentName | uppercase}}</td>
    <td>{{s.gender | lowercase}}</td>
    <td>{{s.age}}</td>
    <td>{{s.CourseFee | currency:'USD':'$'}}</td>
   
</tr></tbody>

</table>


In the above code we change the above highlighted text to achieve the functionality.
we added uppercase,lowercase and currency pipe for Name,gender and course fee respectively.
Output is as below.


In the above table we can see Name values are Capital case,Gender value is small case and Course Fee is appended with $ symbol .


Share:

Custom Pipes in Angular 8

What is Pipes in Angular 8?


Pipes is nothing but transform the data into a required format. We can use the operator " | " to implement pipes.


Angular-Pipes
Angular-Pipes


In Angular 8 we have 2 types of pipes available.


In this article we will discuss Custom pipes. If you want to know about Build in Pipes visit Build-In Pipes In Angular.

When we go for Custom pipes?

As we know Angular provides build-in pipes, but when we need a different format which is not available in build-pipes, then we go for Custom Pipes.

Example - 
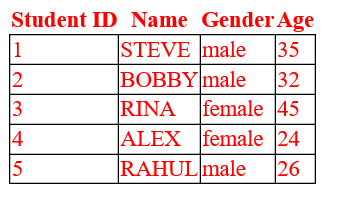
Lets say We have a table as shown below.

Angular Raw Table
Angular Raw Format

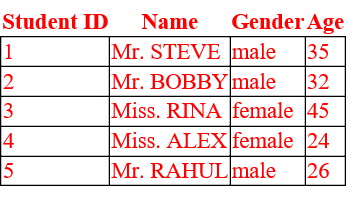
In the above table we need to append the Mr and Miss to the Name column based upon the Gender.
This can be implemented using Custom Filter. So that we can get the output as below.

Angular Formatted Table

Steps to create Custom filter

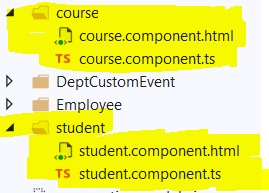
1.Create a folder and create highlighted files under app folder.


Here student.pipes.ts is for Custom pipes.

2. Open student.component.ts and write the below code.


import { Component,OnInit } from '@angular/core';

@Component(
    {
        selector: 'student-list',
        templateUrl: 'app/student/student.component.html'
    })

export class studentcomponent implements OnInit {
    ngOnInit(): void {
        this.getStudent();
    }
    studentdetails: any[];
    getStudent(): void {
       
        this.studentdetails = [
            { studentID: 1, studentName: 'Steve', gender: 'Male', age: 35},
            { studentID: 2, studentName: 'Bobby', gender: 'Male', age: 32},
            { studentID: 3, studentName: 'Rina', gender: 'Female', age: 45},
            { studentID: 4, studentName: 'Alex', gender: 'Female', age: 24},
            { studentID: 5, studentName: 'Rahul', gender: 'Male', age: 26},
        ];       
    }
}

In the above code we are creating a student table with the details.

3. Open student.pipes.ts and write the below code.


import { Pipe, PipeTransform } from '@angular/core';

@Pipe({
    name:'EmployeeTitle'
})

export class MyEmployeeTitlePipe implements PipeTransform {
    transform(value: string, gender: string): string {
        if (gender.toLowerCase() == 'male') {
            return 'Mr. ' + value;
        }
        else
            return 'Miss. ' + value;
    }

}


In the above code is responsible to create the custom pipes . In this case we need to import Pipe, PipeTransform to implement the custom pipe. Name of custom pipe is EmployeeTitle.
Transform method will help to implement the logic where gender parameter will get the value which is passed from the html file and process the value to a proper format.This case we append the Mr or Miss to Name column. Ex. Stove converted to Mr. Stove.


4.Open student.component.html and write the below code.


<table class="table table-responsive table-bordered table-striped">
    <thead>
        <tr>
            <th>Student ID</th>
            <th>Name</th>
            <th>Gender</th>
            <th>Age</th>
           
        </tr>
    </thead>
    <tbody><tr *ngFor="let s of studentdetails">
    <td>{{s.studentID}}</td>
    <td>{{s.studentName | uppercase|EmployeeTitle:s.gender}}</td>
    <td>{{s.gender | lowercase}}</td>
    <td>{{s.age}}</td>
   
</tr></tbody>

</table>

In the above code we are passing the custom filter data to the student.pipes.ts file and get formatted data. Implementation is highlighted as above.

5. Register the Custom pipe class in App module.


import { MyEmployeeTitlePipe } from './student/student.pipes';


@NgModule({
    imports: [BrowserModule, FormsModule, routing],
    declarations: [AppComponent, EmployeeComponent, EmployeeTitlePipe, mycomponentclass,
        CollegeDetailsComponent, CourseComponent, studentcomponent, MyEmployeeTitlePipe],
  bootstrap:    [ AppComponent ]
})


Implement the above highlighted text.
Run your project and you can able to see the output as expected.


Thanks...............
Share:

Routing in Angular 8

Introduction

Angular routing is a mechanism where navigation between angular pages takes place and shown in browser. In below image Student List and Course List are two links . Based upon the click the related page will be shown.


Student-Angular-Route
Student Angular Route

Course-Angular-Route
Course Angular Route


How to Implement Routing mechanism in Angular 8?


1.Create related Typescript file and HTML file for Students and Courses folder as shown below.
Course-Student-folder-Angular-Route
Course Student folder Angular Route


2.Add below code for course.component.html


<table class="table table-responsive table-bordered table-striped">


    <thead>
        <tr>
            <th>Course ID</th>
            <th>Name</th>
            <th>Category</th>
        </tr>
    </thead>
    <tbody>
        <tr *ngFor="let s of courseList;">
            <td>{{s.courseID}}</td>
            <td>{{s.courseName | uppercase}}</td>
            <td>{{s.category}}</td>
        </tr>
    </tbody>
</table>


3.Add below code for course.component.ts


import { Component, OnInit } from '@angular/core';

@Component({
    selector: 'course-list',
    templateUrl: 'app/course/course.component.html'
})

export class CourseComponent implements OnInit {

    courseList: any[];
    getCourses(): void {
        this.courseList = [
            { courseID: 101, courseName: 'BCA', category: 'IT' },
            { courseID: 102, courseName: 'MCA', category: 'IT' },
            { courseID: 103, courseName: 'MBA', category: 'MANAGEMENT' },
            { courseID: 104, courseName: 'B.TECH', category: 'CS' },
            { courseID: 105, courseName: 'B.ARCH', category: 'ARCHITECTURE' },
            { courseID: 106, courseName: 'BBA', category: 'MANAGEMENT' },];
    }
    ngOnInit(): void {
        this.getCourses();
    }
}


4.Add below code for student.component.html

<table class="table table-responsive table-bordered table-striped">
    <thead>
        <tr>
            <th>Student ID</th>
            <th>Name</th>
            <th>Gender</th>
            <th>Age</th>
           
        </tr>
    </thead>
    <tbody><tr *ngFor="let s of studentdetails">
    <td>{{s.studentID}}</td>
    <td>{{s.studentName | uppercase}}</td>
    <td>{{s.gender | lowercase}}</td>
    <td>{{s.age}}</td>
   
</tr></tbody>
</table>

5.Add below code for student.component.ts

import { Component,OnInit } from '@angular/core';

@Component(
    {
        selector: 'student-list',
        templateUrl: 'app/student/student.component.html'
    })

export class studentcomponent implements OnInit {
    ngOnInit(): void {
        this.getStudent();
    }
    studentdetails: any[];
    getStudent(): void {
        
        this.studentdetails = [
            { studentID: 1, studentName: 'Steve', gender: 'Male', age: 35},
            { studentID: 2, studentName: 'Bobby', gender: 'Male', age: 32},
            { studentID: 3, studentName: 'Rina', gender: 'Female', age: 45},
            { studentID: 4, studentName: 'Alex', gender: 'Female', age: 24},
            { studentID: 5, studentName: 'Rahul', gender: 'Male', age: 26},
        ];        
    }
}

6. Create a type script file called app.routes.ts under app folder and write the below code.

import { Routes, RouterModule } from '@angular/router'
import { studentcomponent } from './student/student.component';
import { CourseComponent } from './course/course.component';

export const routes: Routes = [
    { path: '', redirectTo: 'student-list', pathMatch: 'full' },
    { path: 'student-list', component: studentcomponent },
    { path: 'course-list', component: CourseComponent }
];
export const routing = RouterModule.forRoot(routes);

Student-list and Course-list are the link to be displayed in the browser for studentComponent and CourseComponent respectively.
RouterModule.forRoot is used to defining the Route config file in the main module(app.module.ts)


7. Under app.component.html write the below code.

<table>
    <tr style="font-weight:bold;color:blue;border:none;background-color:yellow;">
        <td><a routerLink="/student-list">Student List</a></td>
        <td><a routerLink="/course-list">Course List</a></td>
    </tr>
</table>
<br />
<br />
<router-outlet></router-outlet>

routerLink used to create a link to the component to display the component.
router-outlet is used to show the content of the link clicked.


8. Under App.Module.ts add the below highlighted code .


import { CourseComponent } from './course/course.component';

import { studentcomponent } from './student/student.component';

import { routing } from './app.routes';


@NgModule({
    imports: [BrowserModule, FormsModule, routing],
    declarations: [AppComponent, EmployeeComponent, EmployeeTitlePipe, mycomponentclass,
        CollegeDetailsComponent, CourseComponent, studentcomponent],
  bootstrap:    [ AppComponent ]
})


We are done!!!!!!!!!
When we run the application we can able to see the output as expected.

Share:

Singleton design pattern in C#

Introduction

Gang of Four describe 23 design pattern which help to solve the software design problem. Singleton is one of them.

Description

Singleton design pattern comes under Creational design pattern.Singleton design pattern allows to create only one object for a class.
Singleton-Design-Pattern


Lets create a sample singleton class and see how it looks like.


    class SingleTonClass
    {
        public static int count = 0;
        public static readonly SingleTonClass Instance = new SingleTonClass();
        private static SingleTonClass _EmpSal;
        private SingleTonClass()
        {
            count++;
            Console.WriteLine("Counter =  : " + count);
        }
        public static SingleTonClass EmpSal
        {
            get
            {               
                    if (_EmpSal == null)
                        _EmpSal = new SingleTonClass();
                    return _EmpSal;
                
            }
        }

    }


See the above code. We created a simple class called "SingleTonClass". This class uses 3 important keyword which makes the class singleton.

  • Sealed - Helps to restrict the Inheritance.
  • Private Constructor- Helps to restrict the object creation.
  • Static-This will create static method.

The above code is not thread safe. 

Lets understand Why? 

When we use multi threaded application then the counter value becomes > 1 in private constructor, which violate the Singleton Design Pattern(Singleton allows only one object for a class).

Lets see the below example with multi-thread application.


  class SingleTonClass
    {
        public static int count = 0;
        public static readonly SingleTonClass Instance = new SingleTonClass();
        private static SingleTonClass _EmpSal;
        private SingleTonClass()
        {
            count++;
            Console.WriteLine("Counter =  : " + count);
        }
        public static SingleTonClass EmpSal
        {
            get
            {               
                    if (_EmpSal == null)
                        _EmpSal = new SingleTonClass();
                    return _EmpSal;
                
            }
        }
        public string Empsalary()
        {
            return "100000";
        }
    }

    public class MainClass
    {
        public static void Main()
        {
            Thread th = new Thread(TempEmpsal);
            th.Start();
            Thread th1 = new Thread(permantEmpsal);
            th1.Start();
            //Console.WriteLine(SingleTonClass.EmpSal.Empsalary());
            Console.Read();
        }

        public static void permantEmpsal()
        {
            SingleTonClass.EmpSal.Empsalary();
        }
        public static void TempEmpsal()
        {
            SingleTonClass.EmpSal.Empsalary();

        }

    }

OutPut


This is the reason why the above code is not thread safe.
Then how can we make singleton class thread safe???

The Solution is Thread Synchronization. Using this we can lock single thread at a time. So using this technique we can make the application thread safe.

We need to change the EmpSal Property as below.


public static SingleTonClass EmpSal
        {
            get
            {
                lock (_EmpSal)    //added this section
                {
                    if (_EmpSal == null)
                        _EmpSal = new SingleTonClass();
                    return _EmpSal;
                }
            }
        }

After changing the code see the below output.


One more problem may occur , as our application always keep on locking every-time it may slow down and show performance problem.

So we should use NULL check before the LOCK so that application not LOCK every-time whenever it comes to the property.

We can revised the code as below.

Multi-threading with Thread Lock


public static SingleTonClass EmpSal
        {
            get
            {
                if (_EmpSal == null)
                {
                    lock (_EmpSal)
                    {
                        if (_EmpSal == null)
                            _EmpSal = new SingleTonClass();                        
                    }
                }
                return _EmpSal;
            }
        }

So the Complete code which include thread safe and Performance improvement as below.


  class SingleTonClass
    {
        public static int count = 0;
        public static readonly SingleTonClass Instance = new SingleTonClass();
        private static SingleTonClass _EmpSal;
        private SingleTonClass()
        {

            count++;
            Console.WriteLine("Counter =  : " + count);

        }
        public static SingleTonClass EmpSal
        {
            get
            {
                if (_EmpSal == null)
                {
                    lock (_EmpSal)
                    {
                        if (_EmpSal == null)
                            _EmpSal = new SingleTonClass();                        
                    }
                }
                return _EmpSal;
            }
        }
        public string Empsalary()
        {
            return "100000";
        }
    }

    public class MainClass
    {
        public static void Main()
        {
            Thread th = new Thread(TempEmpsal);
            th.Start();
            Thread th1 = new Thread(permantEmpsal);
            th1.Start();
            //Console.WriteLine(SingleTonClass.EmpSal.Empsalary());
            Console.Read();
        }

        public static void permantEmpsal()
        {
            SingleTonClass.EmpSal.Empsalary();
        }
        public static void TempEmpsal()
        {
            SingleTonClass.EmpSal.Empsalary();

        }

    }


Things to Remember
  • Allows only single object of the class.
  • Difficult for unit testing.

Thanks....................
Share:

Contact for Azure Training

Name

Email *

Message *

Subscribe YouTube

Total Pageviews

Popular Posts

Labels

Recent Posts