AutoResetEvent in C#

Introduction

Lets Understand One of the important part of Threading . 
Auto-Reset-Event class is one of the most important part of the Threading which helps to Manage Synchronize threading with the help of Signals.

Also we will discuss WaitOne() and Set() which will use in AutoResetEvent.

AutoResetEvent just like ManualResetEvent with a small difference which we will discuss here.

This use System.Threading namespace.

AutoResetEvent Flow


AutoResetEvent,autoresetevent,threads,auto reset event,.net,manual reset event,manualresetevent,multithreading,semaphore,threading,c# tutorial,how to create auto reset event in c#,mutex,async,step by step c#,how to createevent in c++,how to create event in c#,thread,step by step .net,computer,how to create manual reset event in c,learn .net,education
AutoResetEvent


Description


  • Create a thread as below.

            Thread thread1 = new Thread(autoresetevent);
            thread1.Start();

  • Create a function called autoresetevent which has below code.
 public static void autoresetevent()
        {
            Console.WriteLine("Thread Started--1.....");
            autoevent.WaitOne();  //Used to stop executing thread
            Console.WriteLine("Thread ended--1.....");            
            Console.WriteLine("Thread Started--2.....");
            autoevent.WaitOne();//Used to stop executing thread
            Console.WriteLine("Thread ended--2.....");
        }


  • Autoresetevent has two methods 
        a. WaitOne();
       b. Set()       
WaitOne() used to keep the thread in a halt mode.
Set() used to give the signal to continue execution which is in halt mode.

Lets Understand with a complete program.

class AutoResetEvent_Example
    {
        static AutoResetEvent autoevent = new AutoResetEvent(false);
        public static void Main()
        {
            Thread thread1 = new Thread(autoresetevent);
            thread1.Start();
            Console.ReadKey();
            autoevent.Set();
            Console.ReadKey();
            autoevent.Set();//For auto reset same number of "Set"                                                  //required for each "WaitOne"
           Console.ReadKey();

        }
        public static void autoresetevent()
        {
            Console.WriteLine("Thread Started--1.....");
            autoevent.WaitOne();
            Console.WriteLine("Thread ended--1.....");            
            Console.WriteLine("Thread Started--2.....");
            autoevent.WaitOne();
            Console.WriteLine("Thread ended--2.....");
        }
    }

In the above example we can check the below statement 
        static AutoResetEvent autoevent = new AutoResetEvent(false);

Constructor of the AutoResetEvent class can be True or False.

True-When the initial state is signaled 
FalseWhen the initial state is not signaled 

Program OutPut


In the above output, thread stop executing after the 1st statement.
Once you press ENTER then next 2 statement will be executed and after that last statement gets executed.

When the constructor value of the AutoResetEvent class is True then 3 statement will execute when we run the application , after that last statement will be executed.

Conclusion

  1. AutoResetEvent  does not allow the thread to execute complete statement at a time.
  2. WaitOne() used to keep the thread in a halt mode.
  3. Set() used to give the signal to continue execution which is in halt mode.
  4. For Each WaitOne() , Set()  is required to continue the thread.

Share:

Serial port communication with Multiple Application

Can two Application Communicate with a single Port?

When two applications communicates with a serial port i.e. When One application send data to another application using a serial port then you will get an error . So this means you can not use a serial port in two application.

What is the Solution of it?

Lets discuss and find the solution of it.

Solution
  • Create an window application whose design as below and add the Baud Rate,Data Bit,Stop Bit,Parity Bit value.

Serial Port Form Design


  • Then browse virtual serial port driver(VSPD) and install it.
  • Open the driver which looks like below.
  • Go to "Manage Ports"  tab, select two ports and click "Add Pair" as below Image.


  • After Pairing you can see the highlighted part in the image.


  • Added the code for the respective button in the Form control code view.
 public partial class SerialPortDataReceived_New : Form
    {
        string[] port = SerialPort.GetPortNames();


        SerialPort serialport;
        public SerialPortDataReceived_New()
        }
        void Serialport_DataReceived(object sender, SerialDataReceivedEventArgs e)
        private void btnConnect_Click(object sender, EventArgs e)


        {

            InitializeComponent();
            methodserial();

        public void methodserial()

        {
            foreach (var item in port)
                cbPort.Items.Add(item);
            btnConnect.Enabled = true;
            btnDisconnect.Enabled = false;
        }

        {                    

            string indata = serialport.ReadExisting();
            txtSent.Text = "Received Data " + indata;
         }

        {

            try
            {
                string PortName = cbPort.Text;
                int BaudRate = Convert.ToInt32(cbBaudRate.Text);
                Parity parity = (Parity)Enum.Parse(typeof(Parity), cbParityBit.Text);
                StopBits stopbit = (StopBits)Enum.Parse(typeof(StopBits), cbStopBit.Text);
                int databit = Convert.ToInt32(cbDataBit.Text);
                ConnectSerialPort(PortName, BaudRate, parity, stopbit, databit);
                serialport.DataReceived += new SerialDataReceivedEventHandler(Serialport_DataReceived);
            }
            catch(Exception ex)
            {
                MessageBox.Show(ex.Message);
            }
         }
        public void ConnectSerialPort(string portname, int BaudRate, Parity parity, StopBits stopbit, int databit)
        {
            serialport = new SerialPort(portname, BaudRate, parity, databit, stopbit);
            if(!serialport.IsOpen)
            serialport.Open();
            btnConnect.Enabled = false;
            btnDisconnect.Enabled = true;
        }
        private void btnDisconnect_Click(object sender, EventArgs e)
        {
            btnDisconnect.Enabled = false;
            btnConnect.Enabled = true;
            if(serialport.IsOpen)
            serialport.Close();
        }
        string str;
        private void btnSend_Click(object sender, EventArgs e)
        {
            
            str += TextBox1.Text;            
            serialport.Write(str);
            txtSent.Text = str;
            
        }
    }
Setup Completed...............................

Lets us go to the application Bin/Debug folder and run two instance of the application.


You can see whatever i am sending from second application is received by 1st application.


Conclusion

  • Two application can not use single port.

  • In serial port one application lock the port , so that other application can not use the same port.

  • To enable two application to communicate with each other we need to create two virtual port and do the Pairing to it.

  • One application can send and the other application can receive data by using Pairing.

Share:

ReadOnlyCollection in CSharp

Introduction


ReadOnlyCollection<T> is a collection which wrap List<T> and do not allow any modification in it.

Any modification in List<T> will be reflected to the ReadOnlyCollection<T>.

We can present ReadOnlyCollection as below 


ReadOnlyCollection<T> readonlyvar=new ReadOnlyCollection<T>(<Collection Object>);


Description

To Understand ReadOnlyCollection we need to take an example. 


  • Take a list of Student Roll number.

            List<int> list = new List<int>();
            list.Add(1);
            list.Add(3);
            list.Add(5);


  • Take ReadOnlyCollection which wrap List object.


           ReadOnlyCollection<int> readonlyvar=new                                 ReadOnlyCollection<int>(list);

  • Try to print element from ReadOnlyCollection .

          foreach(int i in readonlyvar)
           {
                Console.WriteLine(i + " ");
           }

  • After that Insert a value in the middle of the list.

         list.Insert(1, 6);

  • Again try to print the ReadOnlyCollection.

        foreach (int i in readonlyvar)
         {
                
                Console.WriteLine(i + " " );
         }


Below is the complete program which explain ReadOnlyCollection.

        public static void Main()
        {
            //Can change to the list
            List<int> list = new List<int>();
            list.Add(1);
            list.Add(3);
            list.Add(5);
            //can not change to the collection
            ReadOnlyCollection<int> readonlyvar=new                                    ReadOnlyCollection<int>(list);
            foreach(int i in readonlyvar)
            {
                Console.WriteLine(i + " ");
            }
            Console.WriteLine("------------------------------------");
            //Any changes to the list will reflect to ReadOnlyColection              //as below
            list.Insert(1, 6);
            
            foreach (int i in readonlyvar)
            {
                
                Console.WriteLine(i + " " );
            }
            Console.ReadKey();
        }

Out-Put


Why We Need ReadOnlyCollection

  1. Readonlycollection stop allowing to modify the collection.
  2. It improve the performance of the application.
Share:

Application Insights In Azure

Introduction
  • Application Insights is a Performance Management Service(PMS) for web developers.
  • It keeps track of application performance.
  • It uses powerful analytics tool help us to diagnose the issue.
Application-Insight-Architecture


 How to create Application Insights

Go to Create Resources -> IT &Management Tools->Application Insights


Create-Application-Insights
Create Application Insights

How to set application insights to Web-App

Open the Web App --> Application Insights-->Select the enable option -> Select the App insight if created else select the create new resource-> Click on Apply Button.


See the below image


Configure-Application-Insights


Once Configuration is done you can see the telemetry data of Web app will be displayed.


How Web app connected with App-Insights


When ever we create an App insight resource it generate a key called Instrumentation Key.

When we configure the app-insights with web-app then instrumentation key will be added to the application settings of the Web APP, which help to connect both the resources.

Application setting name is APPINSIGHTS_INSTRUMENTATIONKEY and the value is the instrumentation key value.


View Telemetry data


Go to Web app->Application Insights->View Application Insights Data


We can check the below metrics.


  • Live metrics Streams- We can see the live data like Incoming ,outgoing,Overall health of an application.
  • Availability- We can check the availability % of the server.
  • Failure-We can check the failure count and where got failed.
  • Performance-How much time its getting for the server to Get or Post request
  • Alerts  - Generate alert based up on the above matrices and condition , and what action need to be taken if the condition satisfied.
Log-Analytics-Data
Log-Analytics-Data

Benefits


  • Used to Diagnose the issue while running in server.
  • Check the Availability of the application.
  • Check the performance of the application.
  • We get the alert when any changes happen by setting alert condition.
  • Integrate this with all variety of application to check the application health.


Share:

Azure Logic App

What is Logic App


  • Azure Logic app allows developers to design workflows.
  • It Integrates Apps and data across the cloud and on-premise.
  • Azure Logic App is a cloud service that helps you schedule, automate, and orchestrate tasks, business processes, and workflows when you need to integrate apps, data, systems, and services across enterprises or organizations.
  • Logic app articulate intent via a trigger and series of steps, each invoking an App Service API app.


How To Create Logic App

To create a Logic app follow the below steps.


  • Login to Azure Portal.
  • Create a resource-->Web-->Logic App
  • Fill the details and click Create to create a logic app resource.
Fig-1
Logic App creation
Create-Logic-App
Create Logic-App


Design a flow using logic apps

  • Go to newly created Logic App say 'mytestlogicapp'.
  • Go to Logic App Designer.
  • We can see many numbers of template .
  • Choose the Blank Logic App Template.
  • After clicking Blank Template you can see the below connectors and triggers as shown below.

Fig-2

Logic-App-Connectors
Logic App Connectors

Lets take an example .

When a mail come to the inbox it will be auto reply to the sender.

Lets see this in action.


Setup email reply to the incoming mail

In the portal as shown in the above image search for gmail and click it .
You can see the below image.


Fig-3

Logic-App-G-Mail-connector
Logic App G-Mail connector


In the above image fill the From field to where reply mail need to be send.

Add a new step shown in the portal just below the above image.

then fill the details as below.
Fig-4


Logic-App-Auto-Reply-Email
Logic App Auto Reply Email

The above image suggests reply to the mail from where email came.
Save the 


Test the above scenario

  • Send a mail to the register gmail from the above mentioned mail. 
  • The mail trigger in 3 minutes as mentioned in the fig-3.
  • We will receive a reply mail in 3 minutes.

Logic App Run History

We can check the run history to check how many times the mail trigger and success and failure rate.
Run History can be found Under Overview ->Run History

See the below image.

Fig-5

Logic-App-Run-History
Logic App Run History


How Logic App Works

Each time logic app trigger fires(lets say 3 min) the logic app create a logic app instance that run the action in the workflow and execute the logic app.

Things to remember

  • Logic App used to create an workflow used to required job done when the required action happened.
  • It contains 200 connectors to build the workflow.
  • Logic app used consumption based pricing model.

Share:

Azure Function Using Portal

Introduction to Azure Function


•Azure Functions is one implementation of Server-less Architecture also known as 

Functions as a Service (FaaS).

In Azure Functions there are no virtual machines (VMs) to manage.

•In Azure function A number of discrete functions live inside a Function app.

It run either in a consumption plan or App Service plan.


Create Function App

Go to Create a Resources->Search for Function App->Create

Figure-1

Create-Function-App
Create Function App


Figure-2


Create-Function-App
Create Function App

Function App will be created with the name MyNewAzureFunApp as shown above.
Lets create a function Under the function app.

Select the function app called MyNewAzureFunApp  and then select In-Portal as shown in Figure-3.


Figure-3

Create-Function
Create Function

Select Timer or Select More template and select timer trigger and give a name to the timer and time interval when the timer will trigger.  as shown in Figure -4


Figure -4
Create-Function
Create Function


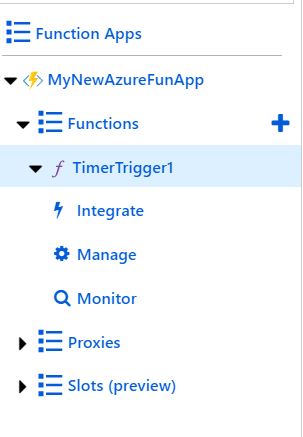
Function(TimerTrigger1) will be created under the function app.


Function and the files


Find the newly created function and file in below figure-5 and figure-6.


Figure-5


Function-details
Function details


                                                                        Figure-6


Function-Files
Function Files
Function Integration


In Figure-7 select the integration link.


                                                                    Figure-7


Function-Integration
Function Integration


  • Select the Outputs.
  • Select the Azure Blob Storage.
  • Install the template dependency if not installed.
  • Set the Blob Parameter name . In my case i set outputBlob.
  • Save the Details.
  • Go to TimeTrigger1 and add the below code.

using System;public static void Run(TimerInfo myTimer,string out outputBlob, ILogger log){ log.LogInformation($"C# Timer trigger function executed at: {DateTime.Now}"); outputBlob="test function";}

  • Save and Run the function.


Check the blob storage after every 1 min  as we given the execution time 1 minutes.
 Each minute a new blob will be created with the “Test function” printed.
Each execution Log will be generated which will be visible below the screen when we select the function created.


How to Disable Or Delete Function 

Select the Function App(MyNewAzureFunApp)-> Select Functions->Disable or Delete the function.


Things to Note


  • Azure function add advanced feature compared to Web Job.
  • It run max 5 min so used to run small piece of code.
  • Pay ₹13.220 per million execution.
  • It is called server-less as no charges will be there till there is no execution .


Share:

App services Plan in Azure

Introduction

An App Service plan represents a set of features and capacity that you can share across multiple apps in Azure App Service, including Web Apps, Mobile Apps, Logic Apps or API Apps

So this means we can create a single app service plan and apply it to multiple App services.

We can say it define a set of compute resources where we can run our app.

Lets create a App service plan and understand it in a better way.

Create App Service Plan

To Create a app service plan go to Crete Resources-> Search for App service plan(classic)

Create-App-Service-Plan
Create App Service Plan


After selecting the app service plan we can see the below screen where we need to choose the pricing tire for the app service.

Create-App-Service-Plan
Create App Service Plan


See the Highlighted part is the Pricing Tire where you can choose the compute resources based upon your requirement. 

Remember if you are selecting higher pricing tier then amount to be paid also high.


Now we should know what is the pricing tier is....


if you click on the Pricing tier which is highlighted in the image you can see there are different pricing tiers are available from which we need to choose one, based upon the requirement.


Pricing tier is of 3 types.
  • Basic
  • Standard
  • Premium
Basic- This is the lowest configured tier. Is called B1. Price cost approximately 32.74USD/Month.It do not have staging slots.

Standard-This is the default tier one and is called S1 .Price cost approximately 44.64USD/Month.It allows 5 staging slots.


Premium-This is the highest configured tier and is called P1V2,P2V2,P3V2.Its pricing is higher than basic and standard. It allows 20 staging slots.It has some additional features of Daily backup and Traffic manager which is not available in Basic and Standard.

Memory usage

We can see the memory usage of the app service plan by following the below steps.App service plan->file system storage.


Memory-Usage-App-Service-Plan
Memory Usage App Service Plan


Points to remember

  •  We can not create App services like web app, mobile app without app service plan.
  • Based upon the size of app , Workload and performance and size we have to choose the app service plan.
  • Can upscale and downscale the app service plan based upon the requirement.
  • Can not delete the app service plan if any application is associated with it.
  • We can put multiple resources to a single app service plan depends upon their capacity.


Thanks.....................


Share:

Contact for Azure Training

Name

Email *

Message *

Subscribe YouTube

Total Pageviews

Popular Posts

Labels

Recent Posts