service in angular 8 example | services in angular 8 tutorial | @Injectable() in angular 8

Service in angular 8 | @Injectable() in angular 8

Service is one of the most important part of angular which helps to define code which is accessible to multiple components in Angular.It reduced duplication of code which help to follow the Do not repeat Yourself(DRY) Principle.


Service in Angular 8
Service in Angular 8  


Why Service in Angular?

Lets discuss this with an example.

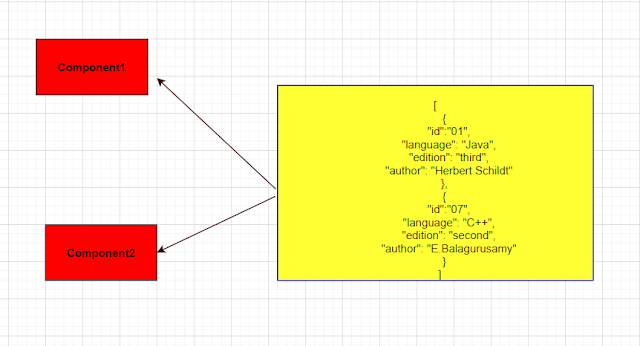
Lets observe the below Image.

Without Service In Angular
Without-Service-In Angular

In the Above Image we can see same JSON file for different component. It violates DRY Principle as discuss above section of this article.

What is the solution of it?

Think once if we can able to create one file and there we write JSON data and distribute among different component then we can reduce code as well as time. The code become cleaner and Understandable.

Now we got the solution, but whats our approach for that solution?

If we create a service in Angular and inject those service among different component then we can able to achieve it. 

So the below flow will be our approach .

With-Service-In Angular


We understood what is Service and Why we need Service.

Now We focus how we implement service in Visual studio.


Implementation


1.Lets create a folder as below as highlighted.


2. Under Testservice.component.ts write the below code.

import { Injectable } from '@angular/core';

@Injectable()
export class TestService {
    constructor() { }
    display() {
        return "display text!!!!";
    }
}

In the above @Injectable() is not not necessary but it is recommend to use this for future purpose.

Marking a class with @Injectable ensures that the compiler will generate the necessary metadata to create the class's dependencies when the class is injected.

3.Under Test.component.ts write the below code.

import { Component, Inject,OnInit } from '@angular/core';
import { TestService } from './Testservice.component';


@Component({
    selector: 'example-component',
    templateUrl: 'app/Test/Test.component.html',

})
export class ExampleComponent {
    text: string;
    constructor(private myService:TestService) {     
    }
    ngOnInit() {
        this.text = this.myService.display();
    }
}

In the above code we call the service method to get the required functionality.

4. Under Test.component.html write below code.

<!DOCTYPE html>
<html>
<head>
    <meta charset="utf-8" />
    <title></title>
</head>
<body>
    <b>
        {{text}}
    </b>
</body>
</html>

In the above we add the above code to display the data.

5. Add the Highlighted code in App.module.ts.

@NgModule({
    imports: [BrowserModule, FormsModule],
    declarations: [AppComponent, EmployeeComponent, EmployeeTitlePipe, mycomponentclass,
        CollegeDetailsComponent, CourseComponent, studentcomponent, MyEmployeeTitlePipe, ExampleComponent],
    providers: [TestService],
  bootstrap:    [ AppComponent ]
})

In the above code we need to register the service and component highlighted.

Run the application , you can able to see the output.
Share:

Method Decorator in Angular 8 | What is HostListener

What is Decorators


Decorators are a design that is used to separate modification or decoration of a class without modifying the original source code.

Decorators are of 4 types.


In this article we will discuss about Method decorator.


What is method decorator

Method decorator is declared just before method declaration.This can be used to observe,modify a method definition.

@HostListener is a good example of method decorator .
When any event happen in our host then we want decorated method to be called.


Method Decorator
Method Decorator


To implement @HostListener decorator we need to import HostListener Interface.


import { Component,HostListener} from '@angular/core';

Lets implement method decorator with an example.

Implementation

1.Create a folder called Test under App folder and add 2 files called Test.component.html and Test.component.ts.

2.Under Test.component.html  we need to add the below code.

<!DOCTYPE html>
<html>
<head>
    <meta charset="utf-8" />
    <title></title>
</head>
<body>
    <b>
        My Text
        <br />
        <br />
        Your Text
    </b>
</body>
</html>


3.Under Test.component.ts  we need to add the below code.

import { Component, HostListener } from '@angular/core';

@Component({
    selector: 'example-component',
    templateUrl: 'app/Test/Test.component.html',
})
export class ExampleComponent {
    @HostListener('click', ['$event'])
    OnHostClicked() {
        alert('You clicked the host');
    }
    @HostListener('mouseover', ['$event'])
    OnMouseOver() {
        alert('Mouse Over');
    }
}


In the above code we import HostListener interface.
Then added @HostListener('click', ['$event']) which allow the method to fire when click event occurs.

4. Write the below code under the App.component.ts .


<example-component></example-component>

5.Register the component class in app.module.ts.

We are done !!!!!!!!!
Run the application and you can see a alert once you mouse over the text.

Thanks............


Share:

Property Decorator | input output decorator angular example | how to pass data from one component to another in angular 8

Decorator in Angular 8 | How to pass data from one component to another in angular 8


Decorators are a design that is used to separate modification or decoration of a class without modifying the original source code.

Decorators are of 4 types.


In this article we will discuss about Property decorator.

Property decorator

Property decorators are the 2nd most common decorator in angular.
Property decorators is of 2 types


  • Input 
  • Output

Input-Output-Decorator
Input Output Decorator


Input Decorator

Input decorator is declared as @Input().
@Input() can be declared by importing Input interface. 

With the Input decorator we simply put the @Input() before the property which angular compiler automatically create input binding from the property name and link them.

Lets Implement Input decorator in Angular 8.

Before that Lets create a folder called Test.

1.Go to App.component.ts and add the below code.

export class AppComponent {
    myvar: string = "This is my Input property....";
}

2.Go to App.component.Html and add the below code.

<example-component [inputprop]='myvar'></example-component>

In the above we are binding a user defined property called "inputprop" which will be linked to the Input property.

3.Create a typescript file called Test.component.ts. and write the below code under the file.

import { Component,Input } from '@angular/core';
@Component({
    selector: 'example-component',
    template: '<div>{{name}}  {{inputprop}}</div>',
})
export class ExampleComponent {
    name: string = "This is my component!!!!!";
    @Input() inputprop:string

}

In the above code we link the property defined in the App.component.ts to the above code by declaring @Input.

We are done!!!!!!!!
Once we run the application we can able to see the output in the browser...

Output Decorator

Now Lets understand Output decorator .
Output decorator declared as @output().

@Output() can be declared by importing Output Interface and EventEmitter class.

The logic behind this is variable associated with @Output hold the event assigned by EventEmitter class.

Event can be emit with the help of emit().


Lets take a scenario.

A button and string value is in child component.
When button clicked then the string value will be displayed in the parent component.

Lets implement the output decorator .

1. Under Test.component.ts write the below code.


import { Component,Output,EventEmitter} from '@angular/core';

@Component({
    selector: 'example-component',
    templateUrl: 'app/Test/Test.component.html',
})
export class ExampleComponent {  
    @Output() mydataevent = new EventEmitter<string>();
    myoutputdata: string = "My output data";
    GetData(): void {
        this.mydataevent.emit(this.myoutputdata);
    }

}

In the above Output interface and EventEmitter class are imported.
mydataevent  hold the event  and emitted to the parent in the hilighted text.

2. Under Test.component.html write the below code.

<!DOCTYPE html>
<html>
<head>
    <meta charset="utf-8" />
    <title></title>
</head>
<body>
    <button (click)="GetData()">Click Me</button>
</body>
</html>


In the above we are generating a click event and call a method called GetData() to execute the method.

3. App.Component.html write the below code.

<example-component (mydataevent)=displaymethod($event)></example-component>


{{mytestvalue}}

In the above code we received the event highlighted above and then call the displaymethod($event) to display the method content. 
$event received the data passed from the child component.

4. App.Component.ts write the below code.


export class AppComponent {    
    mytestvalue: string;   
    displaymethod(myvalue:string): void {
        this.mytestvalue = myvalue;
    }


In the above we receive data and display the data in the html by  {{mytestvalue}}

5. Do not forget to register the associated component class in the the app.module.ts. 

You can run the application and Generate a event by clicking the button. You can see the output as below once u click the button.


Output Decorator
Output Decorator

We are done!!!!!!!!!!!!!!!!!
Share:

Contact for Azure Training

Name

Email *

Message *

Subscribe YouTube

Total Pageviews

Popular Posts

Labels

Recent Posts