Azure Resource Group

Azure Resource Group

        Azure Resource Group is noting but a container used to hold all types of resources .It hold the related resources in a group so that its easy to manage and maintain.We can move a resource group from one subscription to another.We can move a resource from one resource group to another .

Create a resource Group

      Follow the below steps to create a resource group.
Create Resources -> Search for Resource Group ->Click on Create.
You can see the below screen .
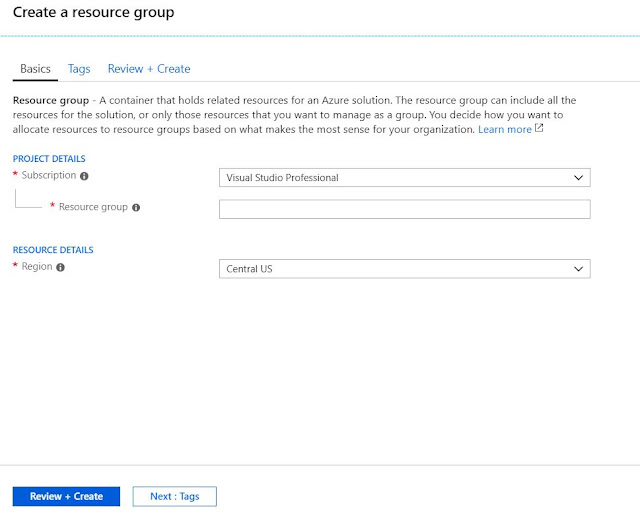

Create-Resource-Group
Create Resource Group

You can see the Subscription name,Resource Group name, Region need to fill. If you have more than 1 subscription then you can see in subscription drop-down. 

After filling all the details Click on the Review+Create button .
This will create a resource group for you.

if you want to put a resource in a specific resource group then select that resource group from the existing resource group list while creating of the resource.

Delete a resource Group

If we delete a resource group then associated resources will be deleted . We can delete the resource group by selecting the below.
Click on the resource group -> Delete resource group->Portal will ask the exact name of the resource group->Delete

Add a resource to a Resource Group

While creating any resource in Azure it ask to select the resource group. 

Add-Resource-to-a-Resource-Group
Add Resource to a Resource Group

See the above image where you can select your own resource group or you can create a new resource group and assign to that resources.


Move resources from One resource Group To Other

We can Move a resource from One resource group to Another. This can be done by following the below steps.

Move-Resource-to-a-Resource-Group
Move Resource to a Resource Group


Select your resource(Here Web-App) and click on Change highlighted in the above image. 
Then it will ask for Resource Group(in drop down) where you want to move your resource .

select the resource group and click OK.
See the Below Image.

Move-Resource-to-a-Resource-Group
Move Resource to a Resource Group

Your resource will switch to the required resource group.

Summery :-

  • Resource group used to categorize the resources .
  • We can keep different region resources in the same resource group.
  • We can rename a resource to a resource group.
  • Easy to maintenance.
  • Can be helpful for security constraint.


Share:

Break and Continue Statement in C#

Introduction

Break and Continue are the two words are widely used in C#.NET and it make sense as this two are most important statement in C#.
They widely used in loop in C#.

Continue is used to skip the current iteration code written after continue statement and ask the compiler to continue the next iteration.

Break is used to exit the loop and will not continue the loop further.

Continue


Continue-Statement-in-C#
Continue Statement in C#

In the above Flow diagram when it reach the continue statement it skip the current iteration and execute the remaining iteration. 
Lets Understand with a simple program.

class MyClass
    {
        public static void Main()
        {
            MyClass myclass = new MyClass();
            myclass.Understand_Continue();
            Console.ReadKey();
        }
        public void Understand_Continue()
        {
            for (int iContinue=1;iContinue<=5;iContinue++)
            {
                if (iContinue == 3)
                    continue;
                Console.WriteLine(iContinue);
            }
        }
    }

Output
Continue-Statement-in-C#-Output
Continue Statement in C# Output

Look at the above statement Highlighted with Yellow color.  This suggest that if the value iContinue=3 then the  below write statement will not executed and will go back to For loop for Next iteration.

See the Output where 3 is not printed as expected.

Break

Break-Statement-in-C#
Break Statement in C#


In the above Flow diagram when it reach the Break statement it exit the loop and will not execute the remaining iteration. 
Lets Understand with a simple program.

class MyClass
    {
        public static void Main()
        {
            MyClass myclass = new MyClass();
            myclass.Understand_Continue();
            Console.ReadKey();
        }
        public void Understand_Continue()
        {
            for (int iBreak=1;iBreak<=5;iBreak++)
            {
                if (iBreak == 3)
                    break;
                Console.WriteLine(iBreak);
            }
        }
    }


Output


Break-Statement-in-C#-Output
Break Statement in C# Output

Look at the above statement Highlighted with Yellow color.  This suggest that if the value iBreak=3 then the  below write statement will not executed and will exit the  For loop.

See the Output where 1,2 is printed and not printed the remaining values as expected.


Conclusion

  • Break statement used to exit the loop where as Continue statement used to skip the current iteration and execute the remaining.
  • When we want to exit the loop in middle of the execution we use Break.
  • Break will work for the current loop . It will not work for the external loop if nested.
  • Continue also work for the same loop , not for the external if nested loop is there.
Share:

Contact for Azure Training

Name

Email *

Message *

Subscribe YouTube

Total Pageviews

Popular Posts

Labels

Recent Posts